-
I Put Peak Design Anchors On My Vintage Camera Strap
One of my old film cameras came with a velvet lined camera strap. Someone had sewed elastic to one end to hold film canisters. I love the retro look of the strap but somethings bugged me.
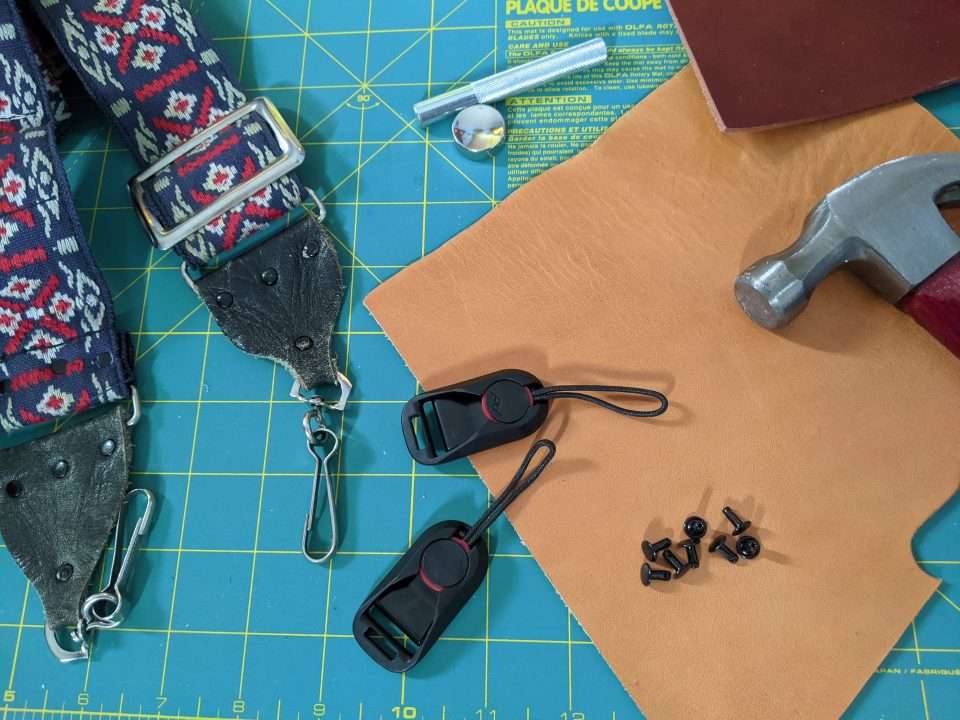
I didn’t want my cameras to get scratched up with the old clips on the strap. The leather was stretched out and I didn’t know how long it would hold up. I was given some Peak Design Anchor Links for xmas so I ordered up some leather and rivets from Springfield Leather Company. I got out my leather punch got to work.

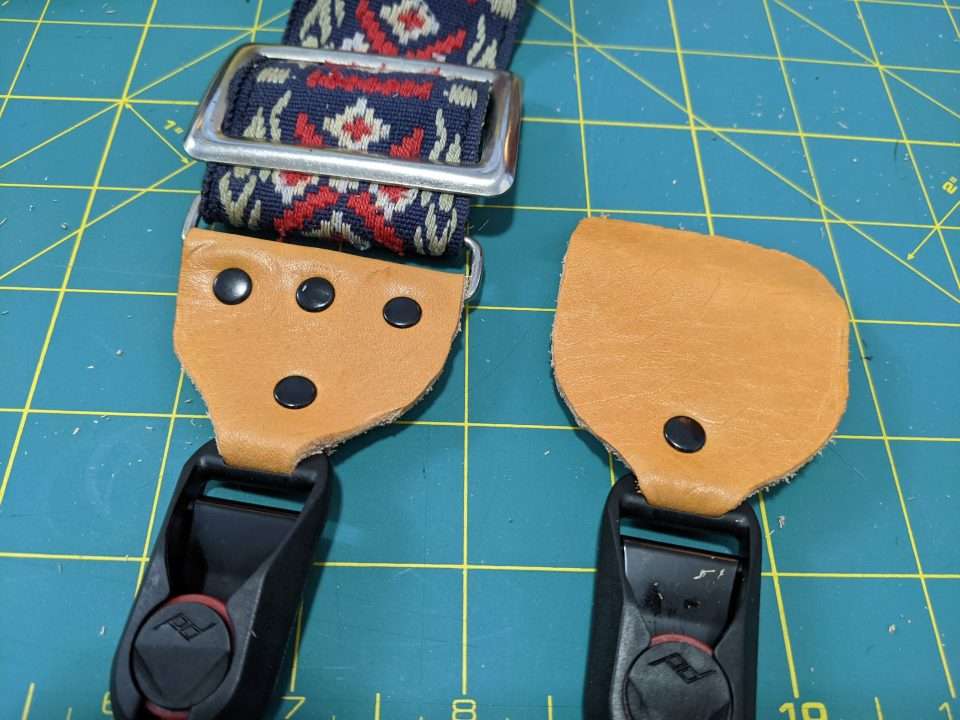
Here you can see how stretched out the leather was. Who knows how long it had left. I didn’t like the clips because they were hard to change to different cameras and were noisy and over all I didn’t like them.
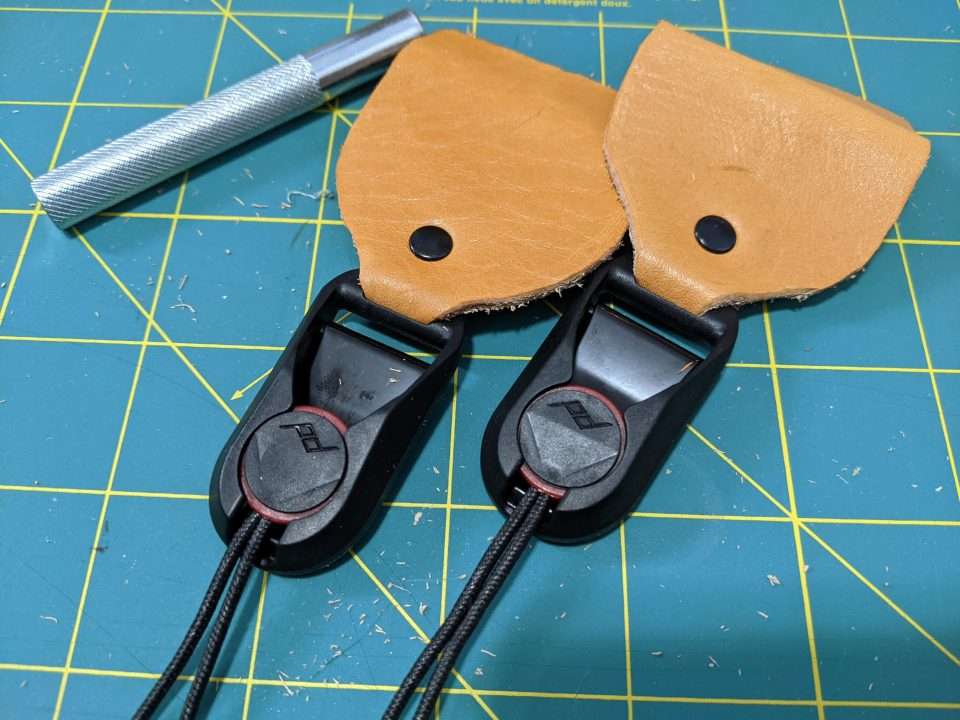
My new Peak Design Anchor Links ready to live on a vintage strap.
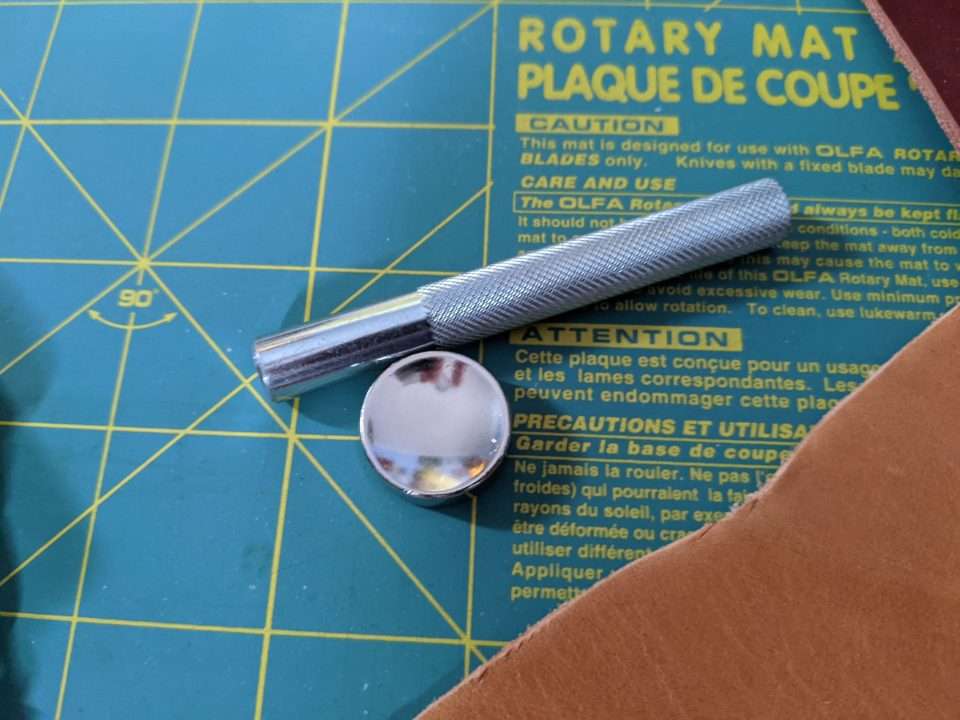
Springfield Leather company has a small anvil that you can use to pound the rivets together.
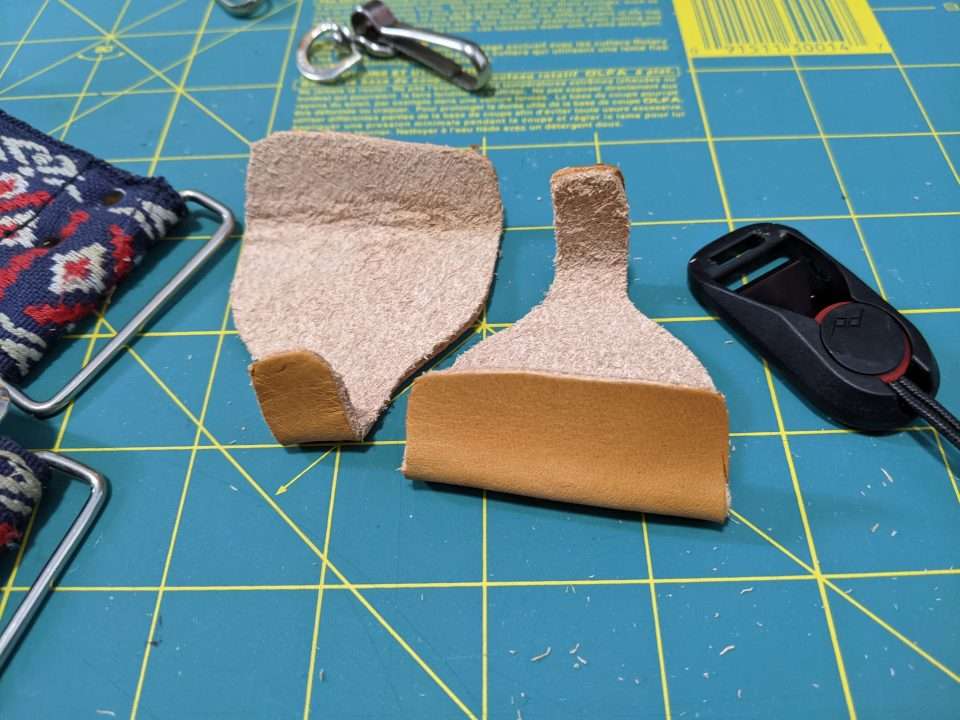
I very roughly approximated the shape of the old leather. I used the natural color leather because it was the thinnest in the pack of the bridle I picked out.
I creased the leather bits up a bit so they would be easier to fit on the strap and the links while installing the rivets.
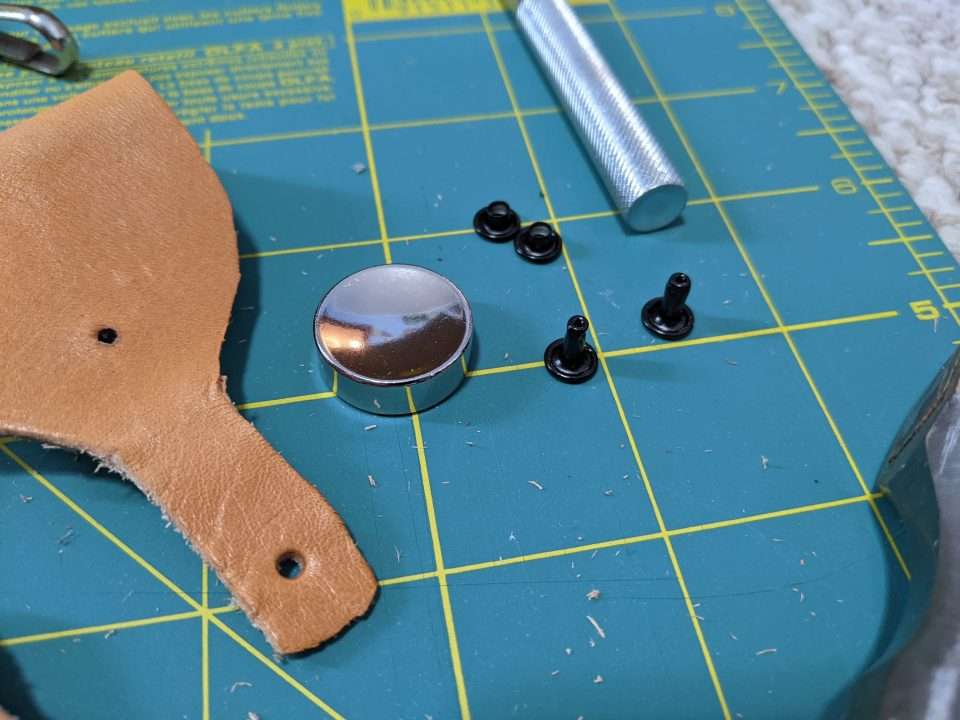
First couple of holes punched. I bought the small black 3mm rivets and I could have used the medium and been fine too.
Anchor Links installed.
First end of the strap finished I could have gone longer on the length of the leather. I’ll fix that on the next strap 🙂
Both sides of the strap done.
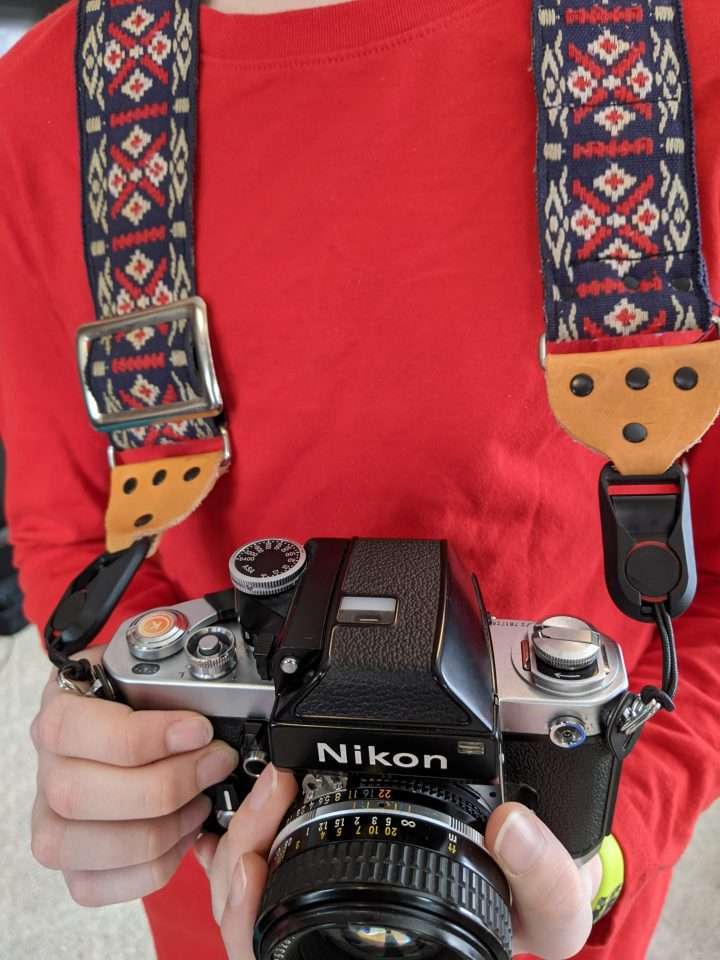
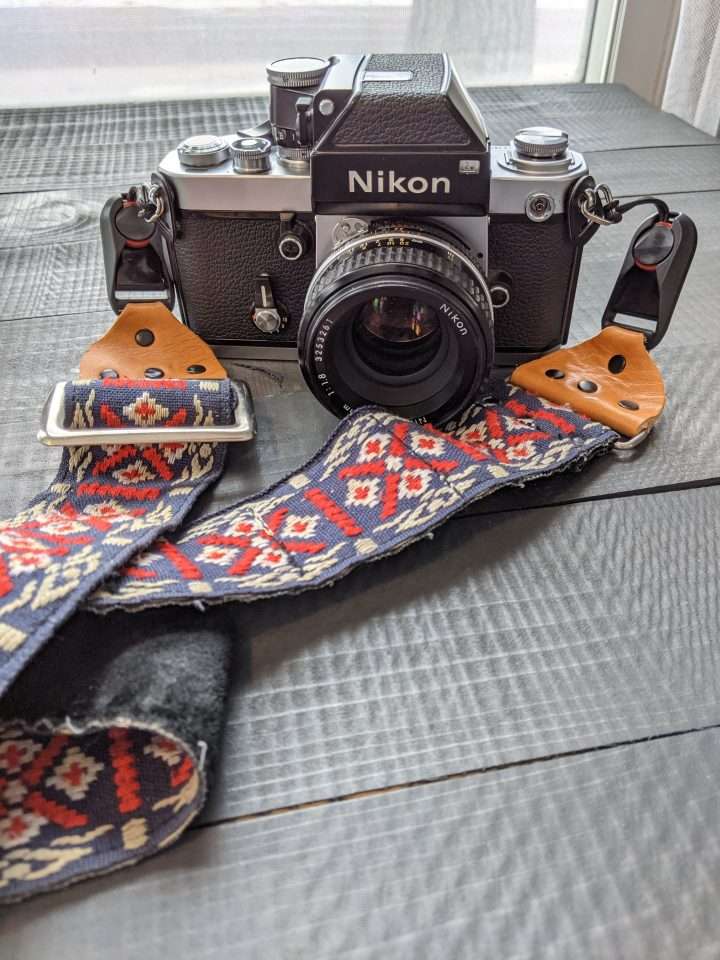
Here’s how the strap looks on a Nikon F2.
Sitting pretty. I like the contrast with the natural leather and the black rivets. I’ll be on the lookout for more straps to upgrade when I’m vintage shopping.
-
Things to do while not taking photos for clients
Now that lots of us are stuck at home with possibly no income, it’s going to be rough. We can try and use these times to do things we normally wouldn’t do or might not have time for. If allowed we can to take pictures in nature if we aren’t sheltered in place. Where I live we’re still allowed to go out of the house, but other countries like Italy, it’s essential business only.
I’m in front of my computer for my photography. However, now lots of people are kind of forced to do some work from behind a desk. So, I’ll give you some ideas for you while we’re all at home!
- FIX THE WEBSITE. (DUH!) Most of us are busy and don’t have the time to update websites. Now we can, if you want! We can take care of basic stuff like updating your most recent work, maybe start blogging. Sprucing up things to make your website look good for potential future clients. It can also be a time to work on the SEO of your website to make it more loved by search engines.
- DO THE SOCIAL MEDIAS. (EW!) I have a love/hate relationship with social media (Some people LOVE it!). In my opinion it’s not important to be EVERYWHERE. You should be where your clients are and the places you love, so two maybe three main places. Example of social media to pick from : Instagram, Facebook (I just autopost here from Instagram I am loathe to hang out there.), Twitter (my political side hangs out there)., Flickr (please get better.), 500px, Behance (Adobe portfolio), Reddit (great for discussions), etc. Always make sure you’re website is listed wherever you are! Maintaining social media can be a day job for lots of people. But now we’re all a home we can add social media management to our resumes, why not work on them!
- PEEP ON YOUR FAVORITE FOLLOWS! I like to check out people’s work on Instagram. I can easily get stuck watching stories so I have to be careful. It’s great for inspiration. Now is a good time to start all those conversations with the people you love to follow.
- REDO ALL THE PHOTOS YOU LOVE and HATE. Especially for photographers who have a HUGE pile of images that are still laying around. I could spend forever processing photos from my
lazinessbacklog. Don’t forget to look at your really old images! Processing styles and skills change over time. Take a hard look at the photos you love and try a new skill on them. Don’t forget to try the same thing on photos you thought you hated. - CHANGE UP YOUR FILE ORGANIZATION AND CLEAN YO STORAGE. I have thousands of RAW files on my storage drive. Most of them I will probably never use. I finally have a good year/month/day structure but many people don’t. Now is a good time for making a good directory structure, sorting your photos and deleting a bunch of them. Make several passes with different criteria, focus, composition etc.
- LEVEL UP. The double U double U double U is an endless resource we can use to increase skills. A beginner will have the cheapest go at it since most free education for photography is beginner level. The biggest resource is going to be YouTube. Being stuck at home can be great time to work on your processing skills. If you have the means, paid education can be had by buying a tutorial or book or joining a paid education forum or group. If you’re a photographer with the skills, try offering (paid) teaching online via Zoom or other channels.
- GET YOUR SHIT TOGETHER. Right now I am working on making my ideas actually happen. Looking for inspiration, journaling ideas and making lists, bullet journals are great for this. This extra time at home can be a good opportunity to prepare a bunch of projects so that I can start them when all of this is over.
- CULL THE GEAR.
SomeAll of us has gear from doing years of buying the newest junk we just had to have.SomeMost of it we never use. Stuff like old lenses, bodies, tripods, gadgets, etc. Sort everything and see what you can give away or sell. - LEARN TO PROPERLY PRINT. You probably already do this, but spend the time to make some good prints of your work. Learning how to get great prints of your work is just another level to your skills. It’s an entirely different experience to hold a 20×30 print and hang it in your house. Printing is a skill that is hard to master. At first, the print rarely comes out how you want. Things like paper, mountings, print profiles, calibration, sharpening, PPI and size can affect the final print. There’s a ton to learn about, it’s something you can easily spend $$$ and time on to get it right.
- TRY DIFFERENT ART. It’s always beneficial to try out different artistic pursuits. It doesn’t even have to do anything with photography, things like watercolor, drawing, writing or even coding and give our minds a new outlet and make us more well rounded.
- GET ON YOUR KNEES. Macro can be a therapeutic outlet in these trying times. I’ve brought home a bunch of flowers and just used a bit of window light to get through a phase of burn out. Or trying to get the perfect photo of your pets whiskers can take up a whole afternoon. You don’t need to have a macro lens for this to work, grab an old body and try out freelensing with with your 50mm.
- FILM. If you’ve always been digital or used to do film photography. Now is the perfect time to start. I’m always seeing film and home developing supplies and camera on my local Craigslist. If your local photography friends have a camera laying around and order up some film and have a go.
OR you can do none of this. All of this sucks and there no rules that say you have to be productive right now. Stay safe.
-
How I Organize My Files
There are many ways to organize your files, this is how I do it.
First off I am not a Lightroom user. I bought LR 6 before CC/Classic came out. I have it installed to make use of the Negative Lab Pro for my color film scan conversions and a few presets I may have purchased in the past. I don’t take catalogs and LR into consideration when I am ingesting new files or moving them around.
I have a Drobo that holds my main storage. And I have a working storage drive on my desktop. Using Bridge I will import my photos to a working folder on my desktop machine and name the folder YYYY-MM-DD and the a descriptive name for the folder. This is something that I have to get better at since I often take photos in the same place or with the same people or doing the same activity.
Once my photos are done converting to DNG and are in my working folder if I’m doing my edits I’ll keep all the new files in the same folder. I used to have a capture folder for RAWs and a master folder for PSDs and an output folder for JPEGs but that made it hard to view all the files from one capture in Bridge. So now they all live in one folder and I use the filter in Bridge to pick from the different formats.
So since all the files are living in the same folder I can view the differences once they’ve been edited and sharpened and cropped with just a few clicks.
When I’m done editing or if I didn’t have time to edit when I was ingesting files I move them to the photo storage partition of my Drobo. I have a backup service that backs up any new files.
I really find using the native Windows explorer to manage my files more intuitive that using LR. But if I’m scanning color film I do have to bring it into the mix since Negative Lab Pro is a LR plugin. The steps are similar but once the conversion is done and I have my positive version TIFFs I can move them to the Drobo once I’m done doing any tweaks in Photoshop.
If you want to learn to use Bridge (it’s free with and Adobe ID) I can’t recommend enough taking a Damien class. I’ve taken all his classes and he’s really helped me understand PS and Bridge better.
-
Non-Photo terms for the Photographer
Fuzzy Parts aka Blurry Parts – This the part of the photo that is out of the depth of field.
Cut off head – Artistic cropping of the face to emphasize the eye of your subject.
They won’t let me print this – Print release that wasn’t paid for.
Fancy Camera – The several thousand dollar investment to your craft that you know inside and out and you wield with complete control.
Doodads – Anything from flash and strobes to backgrounds and props.
Bits and bobs – Cords, cables, stands, sandbags and apple boxes.
Just bring your camera – You’re not invited as a guest you’re invited to provide a service, free. Aka unpaid labor.
4x6s – Proofs, never ordering bigger prints
A couple of shots for the Xmas card – Unpaid labor
I’ll buy you coffee – Payment for unpaid labor
I’m selling my house – Unpaid labor
Hey Bobby is a senior now – Unpaid Labor
I’m looking for a new job – Unpaid Labor
Guess how many followers I have – Unpaid Labor
Lets collab – Unpaid Labor
I’ve got a great idea for a podcast – Unpaid Labor
I’ve got a friend who’s a photographer – Someone who will work unpaid.
-
Minolta HiMatic 9
Here is a photo of my newest camera. It’s a Minolta Hi-Matic 9 with Easy Flash. I purchased it from the original owner after he had posted it for sale on Craigslist. He had picked it up in a department store in Minneapolis in the late 60s. I’ve cleaned it up a bit, put a fresh battery in it and loaded it with some expired film I found cheap at a thrift store.
I went with the Wein cell battery replacement since I plan on using the automatic setting a bit and didn’t want the meter to be reading off. I should have bought two batteries as my Minolta SR-7’s battery has died in the year since I put a new one in.
Here’s the Camera Wiki page on the camera. I’ve got to get used to the rangefinder focusing but I’m sure it will be a fun little camera. I think I’ll shoot this first roll on the automatic setting to see how well it works. Hopefully I’ll be getting some fresh film for xmas to really put the camera to the test.
The camera has a nice weight to it but not to heavy for my aching hands/arms. The metal is very smooth and it’s a bit of work to adjust the rings for the shutter and aperture. The film advance lever does have a huge throw so keeping it up to your eye and advancing will take some practice.
-
Using up old film in old cameras
Yesterday I got a three rolls developed and scanned! I feel so accomplished!
I bought a 120 roll of expired Kodak Verichrome Pan 125 at an antique store nearby and ran it through the Yashica 124G. This was the second roll I shot through this camera and it is so fun to shoot! Right now I’ve got a roll of Portra 160 in it that I think I’ll use up for my dad’s family xmas this weekend.
I also developed a roll of Fuji Superia that I put through my new Nikon F100 to give that a test. I’ve been very happy shooting the F100. I think I will sell the N8008s since I don’t need two similar Nikons. I really appreciate the autofocus on the F100 and like that it sits at nice place in the Nikon film lineup to use newer and older lenses.
I decided to put an expired roll through my new HiMatic 9 to see if it had any light leaks. When I opened up the back to clean it up a bit after I got it home there was some bits of seal loose. But it looks like nothing to big was missing.
Developing was a nice time in the darkroom. I got a chance to clean up a few things and move one of the enlargers out to sell at a gear swap this weekend. A real comfort was having the space heater in the room that we picked up. I gave myself a refresher on color development with the roll of Superia and old Kodak Gold.
The old roll of Verichrome Pan was a huge what if. It expired in 1972 and I shot it at ISO 6 after some internet research I decided that my Ilfosol 3 might just work. I shortened the time and lowered the temp by a few degrees and I got the shots!
-
When You Live In a Boring Place
Finding cool things to photograph where you live can be the ultimate level up for your art. As someone from out of town coming to your dull village I would probably find it quaint and interesting. I would see stimulating details that are refreshing to shoot.
Where I live can be dull and boring and I don’t like “going out and shooting something cool”. But I know that every time I try I become a better photographer. The best way to get your brain in the game for this task is to pretend that you have been given an assignment from a publisher and an angle to shoot from.
Some examples could be; find the best bakery, or small mom and pop restaurant, find the best AirBnb or kitschy motel, find the craziest car or truck someone has mod-ed. You could also do the traditional photo class route and hunt shadows or lines. Find reflections and color contrasts can strengthen your eye.
Another way to challenge yourself is with your choice of gear. Try a telephoto with small and large depth of field. Or a wide-angle and see how close you can get to people. You can also focus on lighting people with window light or open doors.
The most important thing you can do is shoot everyday. Making your boring corner of the world the next Instagram hotspot can be a skill in your back pocket for the rest of your life.
-
The Inevitable
We have all had it hit us, a creative block. Some point we feel meh with our photography. I’ve encountered more creative blocks than I care to count. I know how frustrating it can be to try and break out of a rut and get caught up being critical. When this sort of thing happens, there are several ways to approach it.
Stop Trying So Hard
I think this has been one of the hardest things I’ve had to learn. But I can’t stress this one enough. It’s easier said than done, but one of the best things you can do for yourself is to stop trying so hard. Let go. If you need to step away from your camera for a little bit, by all means take a break! Just do it. Sometimes stepping away from something for a while can not only be refreshing but just the thing you need to break out of a creative rut.
Revisit Old Images
Go back and look at some of your old work. Edit old images that you may have overlooked previously. This is one way to help draw inspiration
and possibly spark new ideas. Re-editing a photo that you’ve previously thought was spectacular is a fun exercise. I know I’ve changed my style over the years and seeing the proof in one photo that I love can be motivating.Visit A New Location
Go location scouting, plan an excursion to a place you have never visited or a place you haven’t visited in a while! Head out for a day and discover new locations. I often hop in our vehicle and just drive around with the kids.
I have a personal Google Map that has all my locations mapped. I visit them and update my listings and make notes. I bring the kids and we all have fun.
Try Something New
This is one of my favorite ways to break out of a photography rut. If I feel like the work I’m producing isn’t very versatile, I try something new. Try copying a photo you’ve seen in a commerical, album cover or Instagram. My favorite subjects to photograph are my boys, but I often take breaks from photographing them to try out something different.
Film
Return to or get started in film. Flagship film cameras from all major manufactures are cheap on Ebay now days. Grab a roll of 400 speed C-41 or B&W film and get to work learning a new medium. You can get as in-depth as a home darkroom and scanning negatives or just sending off your film and get back the digital files from a lab. Shooting film can reignite your passion for capturing images.
Macro.
I’ve taken out my macro lens to capture nature shots or portraits. I love documenting eyelashes. I typically have to raise my ISO more often then I would with other lenses. This is where auto-ISO comes in handy. Don’t forget to also try macro with and without a flash
In-Camera Double Exposure.
I’ve researched how to process an in-camera double exposure for my camera and spent an entire day devoted to trying it out. Not all cameras have this ability, but it’s where your camera basically layers multiple images on top of each other. Check your camera’s manual to find out if yours has this capability.
Free-lensing.
I’ve taken out my 50mm to try my hand at free-lensing and still photography. Free-lensing (or poor man’s tilt-shift/macro) is where you detach your lens from your camera, hold in place with your hand and tilt. It creates a small, tilted focal plane where most of the image is blurry. I use my backup camera though as I’m paranoid about dust.
Draw Inspiration From the Art World
Drawing inspiration from things other than photography is another great way to escape a creative block. Study art by visiting a museum or online, and really study it… don’t just glance at it. Learn the lighting of a famous painting. Another idea is to watch a movie or listen to music. Try to recreate the feeling in a photograph.
Draw Inspiration From Other Photographers
We all have photographers that we look up to. Study their work and discover what you love about their work so much. A couple of mine are Regina Pagles and John Keatly. Get lost in a photography forum. There is practically an endless amount of tutorials, photography tips, on them that can help you break out of a creative rut.
Draw Inspiration From Your Family
Challenge yourself to capture your everyday, and include yourself in the frame. Remember to change your angles to include different perspectives and feelings. Follow a day in the life for an inanimate lovey of one of your kids. Try an immersion study with one of your children and follow them around all day capturing their daily routine.
Just know that it’s ok to take a break from your camera if you need it. I know there’s a lot of pressure to consistently create. Sometimes the photos I love the most have little to do with perfect light and composition, and more about a specific moment in time that means far more to me than anyone else can see just by looking at the image.
Remember art and creating is all about how it makes us feel.
-
How’s your storage baby?
Things to ask your photographer : A series :
Are you external, internal, NAS, RAID 0-6, cloud, physical, offsite; one, two or three copies?
There, that’s the question.
No really, backup storage for your photographer is all in that (poorly worded) question.
When you pay your photographer to document for you, say like a wedding, event, or even “simple” family photographs, you want to know that the files will be handled safely.
That’s where the 3-2-1 rule comes in. You, and your photographer should have three copies of files, in two separate mediums with one in another location.
So what does that look like during and after a photo shoot? Ideally your photographer should have a dual memory slot camera. Be aware that some cameras that many photographers own and just might use with your event only come with one memory card slot. If having a back-up being made in real time is important to you discuss with your photographer.
Starting with the three copies, there are many configurations this can take but a common way is; one copy on a memory card, one copy as the working files and one copy backed up either before or after editing of either all the files or all the delivered files. Once the backup is made often the memory card is formatted and another backup is made again.
Next is the two different mediums. This may look like a NAS or RAID setup in your photographers office. It might even be a shoe-box full of external hard drives labeled by date. Mostly having two medium is about minimizing the chances of storage failure by having files not be neighbors on your photographers computer in case their house is hit by lightning.
Now probably the most important part of the storage rule is having one copy offsite. Doing this is probably the hardest for some photographers because either they need to squirrel away hard drives in a safe deposit box or pay for a cloud service to backup their backups. And paying for another monthly service as a photographer can add up.
So in conclusion ask your photographer how they handle their backups and make sure you have backups of the files you paid for as well. Here is where I would put my affiliate link to one of the many google-able services. 😉
-
Things to Ask Your Photographer : A Series :
White Balance
Thought I’d start off my new site with a bit of education. Then I thought “Why not make it a series?”
Sounds like a good idea to me so here is the first in the series: Things to Ask Your Photographer, or how to be a better consumer.
I’m going to start with my favorite pet peeve and talk about white balance. White balance is all about the color of light. I’m sure you’ve noticed different colors of light. Morning sunlight, golden evening light, dim red colored light in many bars and restaurants or the cool blue of LED light. All of these affect the look of your photos, the prints and files that you’ll end up spending your money on.
Part of being a good photographer, especially if they are taking your money for their services is knowing how to control light. White balance is how photographers control the color aspect of light either in camera or in post processing.
There are many techniques for controlling white balance but your photographer needs to have one and be skilled in using it consistently. They should be able to tell you how they deal with white balance in or out of camera if you ask them.
Bad answers to your question, “How do you set and process for white balance?”, would be:
- I let the camera decide and leave it on auto.
- I let Lightroom decide and choose auto.
- White balance?
- I use a preset/action for my white balance.
White balance has a large effect on how healthy your skin looks and can accentuate underlying blues, reds, yellows in your skin tone. Getting the correct white balance for your skin in the light that it was photographed in is an important skill a photographer you hire should have.
Every lighting setup and lighting change, even a location change or the passage of time will need a different white balance. It’s not something to leave to the camera, computer or a preset or action. Each lighting situation will need it’s own attention in getting the correct white balance.
Now there can be some situations where a correct white balance can leave you looking like a smurf or a lobster. But a skilled photographer will be able to make the light amazing and your skin look natural.
Choose Your White Balance
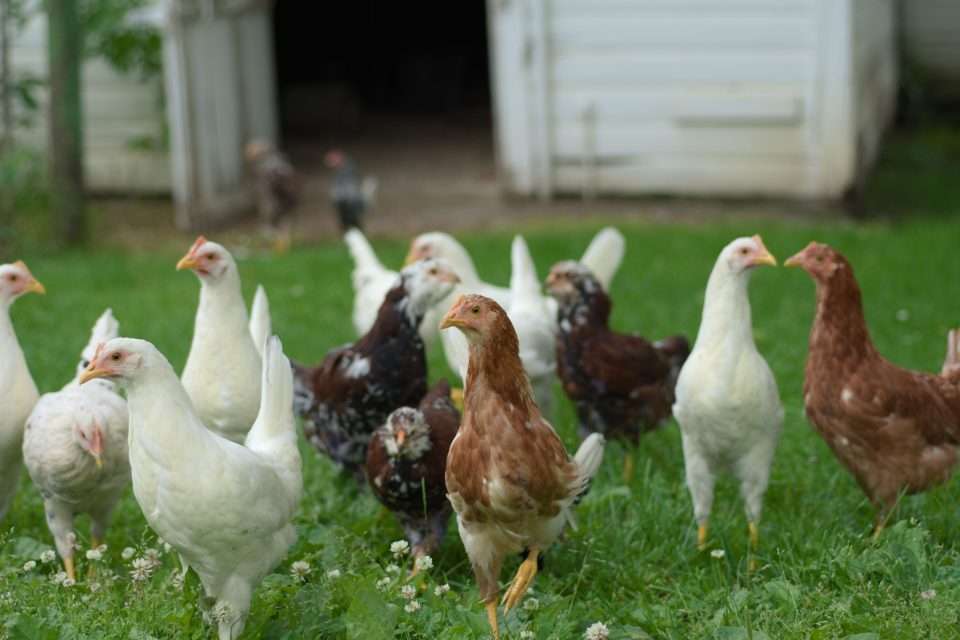
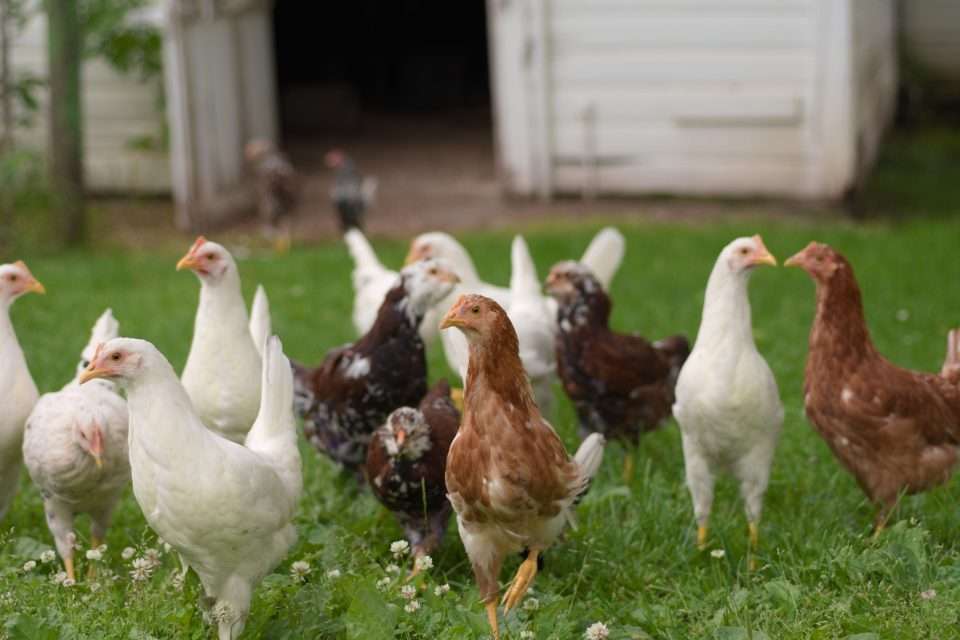
The top photo is how the camera thought the white balance should look on a sunny summer day. The bottom photo is how I chose to correct the white balance. Notice how there is nice pinkness to the ladies combs and how the greenness of the grass has been warmed up on the bottom. The top makes me feel like there is a storm coming and the temp has dropped 20 degrees. The bottom photo has a nice summer glow to the birds and grass.
So, to sum up don’t forget to ask your photographer how they deal with white balance and make sure you’re getting the best files and prints you paid for!